Garlic Parmesan Yellow Squash Chips
Updated Jun 03, 2024
This post may contain affiliate links. Please read our disclosure policy.

These yellow squash chips flavored with garlic and parmesan are a tasty snack with plenty of satisfying crunch! Serve them as an appetizer or take them on the go for an easy treat any day of the week.
I love transforming my favorite fruits and veggies into crispy, stackable versions packed with flavor. If you love this easy recipe, try my sweet homemade banana chips and apple chips, next!

My criteria for the best snacks are always 1) flavor and 2) crunch, and that’s exactly what I get from a batch of these crispy, garlicky squash chips. Whenever my tweens had friends over, I made a batch or two of these chips and served them with a side of barbecue sauce or ranch. Believe it or not, the kids loved munching on them while they hung out! Meanwhile, I feel good knowing they’re snacking on something wholesome. It’s a win-win, and a sign that you should try out these squash chips ASAP.
Why I Love This Yellow Squash Chips Recipe
- Veggie-forward snacking. Bursting with cheesy, herby flavor, these parmesan-crusted chips made from baked yellow squash slices are a delicious way to enjoy your vegetables in snack form.
- Easy to make. With minimal ingredients and effort, a batch of these savory squash chips takes about 30 minutes to make. I bake them in the oven, which means less oil, and lining the pan makes clean-up super quick afterward.
- Versatile. Whether I’m hosting a party, looking for a side dish, or craving a snack, these yellow squash chips never disappoint. Kids and adults alike can’t get enough of the satisfying crunch!

Ingredients You Will Need
Squash chips are a fun alternative to potato chips, with all the flavor and crave-able crunch thanks to a handful of ingredients. Below is a quick look at what you’ll need. Scroll down to the recipe card for the printable recipe followed by a step-by-step overview of how to make these chips from scratch.
- Yellow Squash – Thinly sliced yellow squash makes these chips look pretty similar to potato chips! You can also make zucchini chips if you prefer.
- Olive Oil – Or another type of oil, like avocado oil.
- Panko Crumbs – These can be seasoned or unseasoned Panko crumbs. You can also use regular breadcrumbs.
- Grated Parmesan Cheese – Grated parmesan flavors the breadcrumbs (similar to my crispy parmesan chicken tenders). Grated Romano or Asiago cheese are great alternatives.
- Seasoning – I use dried oregano and garlic powder. You can use another herb or seasoning blend, like dried thyme or Italian seasoning, or get creative! Taco seasoning or spicy Jerk seasoning would also put a fun twist on these squash chips.
- Cooking Spray – To coat the chips before baking. Cooking spray gives these veggie chips a golden, crispy texture and keeps them from sticking to the baking sheet.

Recipe Tips
- Cut the squash into even slices. Do your best to slice your squash chips to an even thickness, this way they’ll bake evenly.
- Don’t overcrowd the pan. Make sure to leave enough space between each chip on the baking sheet so that they crisp up, and don’t steam. If you don’t have multiple baking sheets, you may need to bake these squash chips in batches.
- Keep an eye while they bake. Not all ovens bake the same, and the exact baking time depends on the size and thickness of the squash slices. Check the chips frequently while they bake, to avoid burning. Turn chips halfway for crispness on both sides. You can also bake a small batch first to help pinpoint your perfect baking time.
- Line the pan. Lining the baking sheet(s) with parchment paper or foil prevents the squash chips from sticking, and also makes clean-up a breeze.
- Be generous with seasonings. You can be pretty liberal with the salt, pepper, parmesan, and herbs. Squash is very mild and it’ll take on the flavor of whatever ingredients you season it with.
- Let the chips cool. I recommend letting these yellow squash chips rest on the baking sheet for 5 minutes after they bake. It makes them easier to handle and also lets them reach their full, crispy potential!
Serving Suggestions
The Macedonian in me always craves these crunchy parmesan squash chips dipped in plain yogurt, the same way I’ll dip my sesame bagels (gevrek) in yogurt in the morning! They’re also delicious dunked into bowls of sour cream, marinara sauce, ranch dressing, and homemade dips, like avocado hummus or smoked salmon dip. I even love serving these chips with a side of salsa or guac on taco night.

Storage
Squash contains a lot of moisture, and for this reason these squash chips won’t store as long or as well as traditional potato chips. Enjoy them shortly after making them for the best taste and texture.
Pin this now to find it later
Pin It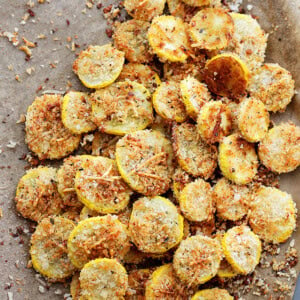
Squash Chips
Video
Ingredients
- 4 medium yellow squash, sliced into 1/4-inch to 1/2-inch rounds
- 3 tablespoons olive oil
- salt and freshly ground black pepper, to taste
- 1 cup panko crumbs
- 1 cup grated Parmesan cheese
- 1 teaspoon dried oregano
- 1 teaspoon garlic powder
- cooking spray
Instructions
- Prep. Preheat the oven to 425˚F. Line 3 baking sheets with parchment paper and set aside.
- Season the squash. Gently mix the squash slices with olive oil, salt, and pepper in a bowl; mix until well combined.
- Make them crunchy. In a separate bowl, combine panko crumbs, Parmesan cheese, oregano, and garlic powder. Dip slices of squash in the Panko/cheese mixture and coat on both sides, pressing on the coating to stick.
- Coat with cooking spray. Arrange the squash in a single layer on the baking sheet. Lightly spray each slice with cooking spray. This will help with achieving a crunchier texture.
- Bake. Bake for 10 minutes. Remove from oven; gently flip over all the slices, lightly spray with cooking oil and bake for 8 more minutes, or until chips are golden brown.
- Cool and serve. Remove from oven; transfer to a serving plate and let cool for a few minutes. Serve with your favorite dipping sauce.
Notes
- Slice Evenly: Make sure your slices of squash are consistent in thickness to ensure they bake evenly.
- Don’t Overlap: Allow space between the chips on the pan for even baking.
- Watch Them: Keep a close eye to prevent burning.
- Flip Them: Turn chips halfway for crispness on both sides.
- Use Foil or Parchment to prevent the squash chips from sticking.
- Season Generously to enhance the mild flavor of the squash.
- Cool Down: Let chips cool to reach full crispness.
- Try a Test Batch: Do a small batch first to find the perfect baking time.
Nutrition
Nutritional info is an estimate and provided as courtesy. Values may vary according to the ingredients and tools used. Please use your preferred nutritional calculator for more detailed info.
How To Make Squash Chips
Here’s how to make crispy garlic and parmesan yellow squash chips in just a few easy steps:
- Slice the squash. First, gather your yellow squash or zucchini and slice it into 1/4-1/2″ rounds.
- Season the slices. Toss the squash slices in olive oil, salt, and pepper so that each slice is well-coated.
- Add crunch. Meanwhile, mix the Panko crumbs, Parmesan cheese, oregano, and garlic powder in a separate bowl. Dip the chips into the crumbs, pressing the coating onto both sides.
- Bake. Now, arrange the breaded squash chips on baking sheets and spray each slice lightly with cooking oil for extra crispness. Afterward, bake the squash at 450ºF for 18 minutes, flipping and spraying them again halfway through cooking.
- Serve. Remove from oven, cool for a few minutes, and enjoy!


I dipped mine in an egg wash to get the breading mix to stick better. It was amazing.
I didn’t have panco so I used Italian bread crumbs. Not bad, very tastey. Next time I will cut them thinner for more crispness. Someone used wire racks instead of flipping individually. I’ll be trying next time too.
Great idea and Keto compliant for me too!!!
Maybe use almond flower instead of the panko bread crumbs. Panko isn’t Keto friendly.
Porkrinds!!! They are 0 carbs & add a good crisp !!
You CAN get gluten-free Panko crumbs! I found some in trying to prepare meals for a neighbor who is gluten and dairy intolerant!
Has anyone tried this recipe in an air fryer rather than the oven?
That’s what I’m looking for!
I imagine they would move about a bit since they are so light.
I’m trying them that way today!
Very Good but kinds’ soft to eat … I thing squash should by ore crisp after cooking
What are you trying to say?
Thanks for this recipe, Katerina!! However, I would suggest your readers use AVOCADO oil instead of OLIVE oil because AVO oil has a higher smoke point. Olive oil, cooked on veggies at this temp, is losing it’s antioxidants and also developing free radicals on the oil and the veggies as well, creating carcinogens that people are consuming.
(Carcinogens can lead to cancer).
Also, if you’re gluten free, like I am, just ditch the bread crumbs. I’ve been making these without bread crumbs for decades and they are super delicious. Not using breadcrumbs can also reduce the “addictiveness” of eating them, which can help with portion control and weight management. Just a thought.
Many Blessings!
Could use coconut oil.
Anita Davis, I so agree with you and there is an avocado oil spray made by Pompeian. I love it and use it on just about everything!!
Great way to destroy a great recipe!
Tried a half-recipe of this due to concerns about space – I only have 2 racks in my oven. Two medium squash filled about a pan and a half (and I ate at least a panful all by myself!) Unfortunately they didn’t get very crispy, but I put the slices on a rack instead of directly on the sheet. I thought that would make them crispier, but who knows. Anyone have any luck getting these extra crispy without burning them?
These were great! Followed your recipe to a T. Thanks!!
Wow!!! Unbelievable! These were fantastic – had to fight my 7yo for them he would have eaten the entire batch had i turned my back.
One question, however – what is the purpose / benefit of the parchment paper?
Keeps them from sticking to the pan and makes for easy cleanup. It might also help them crisp up.
I’ve made these twice already. I use both freshly shredded Parmesan and Romano cheese and half the olive oil. Mmmm mmmm! Sinful perfection! Thank you so much!!!
Or Not-so-sinful* rather LOL!
I have made them n they smell so good cooking n hmm sinfully tasteful
These were amazing and simple. I LOVED the crunchiness. Since my daughter and I are the only ones who eat veggies, I cut everything down (1 squash, 1/4 cup crumbs, etc.) I don’t mind making them and prefer having freshly made ones. I’m going to try it with zucchini later this week. Thanks!
I did the same, just 1 squash, and cut down on everything else, of course. The result tastes heavenly, but they’re not crispy. Maybe a bit more oil? The thinner slices were tough to flip, but whatever… they’re squash, and they taste good! Who’d ‘ve thought? Thank you for sharing the recipe!
I put mine on a cooling rack to bake. I still flipped them, but I just gently played another cooling rack on top of the one with chips on it and flipped it. Faster and easier than flipping one at a time.
Awesome idea!! Will try that the next time I make them!!
So smart
Try cutting them thinner and placing them on a baking rack…no flipping. Yum
When I was growing up, my mom would make the fried zucchini version of these. I definitely have to try this healthier approach!
How do they store, say if you were making to put in lunch for the week.
I was wondering the same thing? Did anyone ever respond to this question?
Hi!
I store them in airtight containers and keep them in the fridge for 3 days. They do get a bit mushy with time, but I don’t mind – they’re still delicious. 🙂
Delicious! I may never try again!
Fry not try!
New family favorite!!!
Thank you!!