Homemade Strawberry Jam
Updated May 29, 2025
This post may contain affiliate links. Please read our disclosure policy.

My small-batch strawberry jam is adapted from my grandmother’s recipe, so you know it’s going to be good! It’s packed with flavor from fresh summer strawberries, made with only 3 ingredients and without pectin.
Like my Macedonian family’s favorite red pepper relish and plum cardamom jam, this homemade strawberry jam keeps for months in the pantry using my easy, beginner-friendly canning method. I’ll show you how to do it!

When I say my Baba (grandmother) made everything from scratch, I mean EVERYTHING. Whether it was homemade cheese, her beloved Macedonian kifli, or homemade jam, we were pretty spoiled. Revisiting her recipes, I realized her strawberry juice doubles as a jam recipe if you simply let the strawberries simmer for longer on the stove. This easy strawberry jam recipe is sweet, juicy, and jam-packed with fresh strawberries. I’ll show you how to make it with 3 ingredients, and how to can it for long-term storage.
The Magic of Homemade Strawberry Jam
- Revisit summer year-round. One of the best parts about making strawberry jam from scratch during strawberry season is canning it for later to enjoy with these sour cream donuts! It’s like capturing summer in a jar! I’ll take you through my basic canning method that you can use for this recipe and all your favorite homemade jams and preserves.
- Nothing beats homemade. There’s nothing like the flavor of fresh homemade strawberry jam spread over toast, challah, or a German pancake, and this beginner-friendly recipe makes it easy.
- No pectin needed. The reason this jam tastes so great comes down to its simple ingredient list: peak-season strawberries, sugar, and lemon juice. That’s it! It thickens up nicely without any added fruit pectin.

What You’ll Need
My grandmother kept most of her home cooking simple, and this strawberry jam recipe is no exception. I’ve included some notes on the minimal ingredients below. Scroll down to the recipe card for the printable recipe, followed by a step-by-step overview with more tips.
- Strawberries – Strawberry season is the best time of year to make this homemade jam. Look for the ripest, reddest, plumpest berries you can find. Be sure to wash, hull, and chop your fresh strawberries before you start.
- Sugar – I recommend regular granulated white sugar for this recipe.
- Lemon Juice – Fresh lemon juice is best, but bottled will work in a pinch. Lemon juice is a key component in homemade jam recipes.
How to Hull Strawberries
The quickest way to hull strawberries is to slice off the green stems with the leaves. It’s how I usually do it, but the downside is that you sacrifice the very top of the strawberry in doing so. One way to avoid this is to poke a sturdy straw through the bottom of the strawberry, and press it out through the top, and the leafy part should pop right off, leaving most of the berry intact.
Jam Making Tips and Troubleshooting
- Don’t skip the lemon juice. The acidity in lemon juice is necessary when making strawberry jam. It not only helps the jam set properly, but it also helps preserve it. If you don’t have lemon juice, you can substitute it with lime juice, which has a similar pH level. Vinegar works in a pinch, but only for short-term storage in the fridge, as it’s less acidic. I don’t recommend it for long-term pantry storage.
- How to fix runny jam: If your strawberry jam looks a bit runny, it’s usually a case of simply needing to cook it for longer. Continue simmering so more liquid evaporates, stirring often.
- What to do if it’s too thick: On the other hand, if your jam is too thick, stir in a small amount of water until it thins out to your liking.
- Avoid burning the sugar. Remember to stir often while the jam simmers on the stovetop. This way, it doesn’t burn against the bottom and sides of the pan. I usually stay close to the stove, prepping my cans and lids for storage, so I don’t get distracted!
- Use a wooden spoon. My grandmother always used a wooden spoon when stirring, and I highly recommend it. Wooden spoons have antibacterial properties and hold up better at high temperatures than other materials.
- Scale the recipe. Double or triple this recipe and make a larger batch of strawberry jam to get you through the winter. I love cracking open a jar of jam for a taste of summer in the chilly months.

How to Tell When Jam is Set
Jam should be cooked to a temperature of 220°F to activate the fruit’s natural pectin and thicken the sugar, which is key to a jammy consistency. The easiest way to tell when your jam is set is to use a candy thermometer. If you don’t have a thermometer, however, you can also do like my Baba did, and go by eye:
- Use the spoon test. If you swirl your spoon or spatula through the simmering jam and hold it up, the jam should be thick and syrupy enough that it doesn’t slide off right away. If it runs off quickly, it needs to continue to cook.
- If you’re still not sure, use the plate test. Chill a plate in the freezer while the jam is cooking. When it’s time to test it, add a dollop of hot jam to the frozen plate and return it to the freezer. After 2 minutes, take it out and pass a spoon (or your finger) through the jam puddle. If it pools back into place right away, it needs to cook for longer. If the jam stays separated by a clean line, it’s ready for canning!
Pectin vs. No Pectin
If you follow this recipe as written, and cook the strawberries to 220ºF, this strawberry jam sets up perfectly thick and “jammy” without powdered fruit pectin. However, if you’d prefer to speed up the process by adding pectin, that’s fine, too. Follow the directions on the package to know the amount and when to add it.
Try These Variations
- Strawberry rhubarb jam. Replace half the strawberries in this recipe with freshly rinsed and chopped rhubarb.
- Strawberry basil jam. Stir in washed and dried fresh basil in the final 5 minutes of cooking.
- Strawberry sauce. My homemade strawberry sauce is a thinner version of this recipe, perfect for drizzling over pancakes and ice cream.
Ways to Use Strawberry Jam
This strawberry jam is so good, I’ll eat the entire jar by itself. But if you’re looking to enjoy it in a way that’s a bit more… ahem… civilized, it’s delicious smeared over butter swim biscuits, toast, dinner rolls, or gevrek (Macedonian sesame bagels). Here are some more ways to use your homemade jam:
- As a topping. Spread it over pancakes, challah French toast, or stir it into yogurt or oatmeal at breakfast. It’s also one of my favorite toppings for ice cream.
- As a filling. Use this jam as a filling for kolacky cookies, homemade French macarons, cakes, or add it to muffin batter. And you can’t go wrong with a classic, peanut butter and jelly sandwich.
- Give it as a gift. Homemade strawberry jam makes an excellent DIY teacher’s gift, stocking stuffer, or party favor. Who doesn’t love a pot of jam made with love?!
Frequently Asked Questions
Yes. If you don’t have access to fresh strawberries where you are, frozen berries are a great year-round alternative. You may need to cook the berries for longer, though, as frozen strawberries contain more liquid than fresh berries.
Yes! I’ve used this same method to make homemade blueberry jam, and it works with other fruits and berries, such as raspberries, blackberries, cherries, peaches, plums, etc.
Yes, your strawberry jam will thicken up as it stands. Keep this in mind when simmering, as you don’t want to cook off too much of the liquid.
Yes. If you plan to freeze your jam, don’t can it. Instead, allow the jam to cool completely and store it in a freezer-safe jar or container, and freeze it for up to 6 months. You’ll need to thaw the jam in the fridge and stir it before you use it.
Pin this now to find it later
Pin It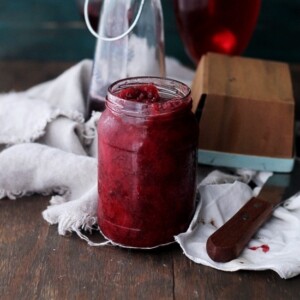
Homemade Strawberry Jam
Ingredients
- 2 pounds fresh strawberries, washed, hulled, and cut in half
- 2 cups sugar
- 1 large lemon, juiced
Instructions
- Macerate the strawberries. Place half of the strawberries in a large bowl. Cover with 1 cup of sugar. Add the remaining strawberries and sprinkle with the rest of the sugar. Stir in lemon juice. Cover the bowl and place it in the fridge for 24 hours.
- Cook. Transfer the berries and the juice into a large saucepan. Over medium-high heat, bring the mixture to a boil; turn the heat down and continue to simmer for 45 to 50 minutes, or until the mixture is thick and reduced. The mixture will continue to thicken as it stands.
Canning Method
- Prep. While the strawberries are simmering, preheat the oven to 170ºF. Wash the jars and place them on a baking sheet.
- Heat the jars. Transfer the baking sheet with the jars to the preheated oven and let it sit in the oven for 30 minutes.
- Sterilize the lids. Meanwhile, place the lids in a bowl and pour boiling water right over them.
- Fill the jars. Remove jars from the oven. Transfer the prepared jam into the jars. Seal with the lids and let completely cool.
- Store. Store in a dry, dark place. Refrigerate after opening.
Equipment
- 2 canning jars with lids
- Heavy saucepan
Notes
- To make strawberry juice: If you want to make homemade strawberry juice at the same time as this strawberry jam, squeeze the lemon juice over the strawberries after you’ve strained out the juice. Then, you can just spoon the strawberries into the prepared jars and pour the juice into the prepared bottle.
Nutrition
Nutritional info is an estimate and provided as courtesy. Values may vary according to the ingredients and tools used. Please use your preferred nutritional calculator for more detailed info.
How to Make Strawberry Jam (Step-By-Step)
This recipe does require planning, since you’ll need to macerate the berries with sugar and lemon juice 24 hours ahead of cooking them down into jam. This helps the strawberries release their juices and activates the berries’ natural pectin, which is what gives this homemade jam its gelled texture. Let’s get started:
- Combine. As mentioned, you’ll do this step the day before. Wash, hull, and chop the strawberries in half. Afterward, layer half the strawberries in a bowl with 1 cup of sugar, topped with the rest of the berries, then more sugar. Stir in the lemon juice.
- Refrigerate. Now, cover the strawberries and place them in the fridge overnight.
- Gather what you need. To make your strawberry jam, you’ll need a large heavy-bottomed saucepan, as well as heat-proof glass mason jars (with lids) for canning afterward.
- Cook. Add your strawberry mixture to the saucepan. Bring that to a boil over medium-high heat. Then, reduce the heat and simmer for 45-50 minutes until the jam thickens. Don’t forget, it will continue to thicken while it cools down. Lastly, seal the jam in sterilized jars, see below.
Easy Canning Method
While the strawberries simmer on the stovetop, prepare the jars and lids you’ll use to can your jam. I use this canning method to store everything from jam to homemade relish and chutney, and it hasn’t failed me yet. Here’s how to do it:
- Heat the jars. While the strawberries simmer on the stovetop, preheat the oven to 170ºF. Meanwhile, rinse out your jars, then arrange them on a baking sheet. Place the tray with the jars into the 170ºF oven for 30 minutes.
- Sterilize the lids. Place the lids in a large, heat-proof bowl and pour boiling water over them, so they’re fully submerged.
- Fill the jars. When they’re ready, take the jars out of the oven. Divide the strawberry jam between the sterilized jars (a wide funnel comes in handy here), then seal the lids. Or, do what I do, and leave one open so you can dig right in with a spoon! Allow the jam to cool before storing. See the section below that covers how to store your jam before and after opening.
Don’t skip the sterilization step! This is SUPER important. If you don’t sterilize the jars and lids, anything you store inside them will go off during storage. I’ll often even take the extra precaution and wear gloves when canning. Better to be safe than germy!
How Long Does Homemade Strawberry Jam Last?
- Store unopened jars in a cool, dry, dark location, like the pantry, for up to 6 months. If you notice your strawberry jam shows signs of mold, odd changes in texture, or if it has a sour smell or taste, it’s best to discard it as it could be contaminated.
- After opening, keep your jam in the fridge for up to 1 week.


Once you seal the jars, do you have to put the jars in boiling water to have the lids pop down?
Please email me your reply?
Hi Angie!
No, you do not have to let them sit in boiling water. Cover the jars with the lids and let completely cool on the counter. Refrigerate after opening.
Totally beautiful jam!! I live for canning season every summer.
Gorgeous!! I’d eat the entire jar too. 😉
Your strawberry recipes are inducing a constant craving for the plucky red fruit.
Strawberry jam is my absolute favorite, I adore this!
This looks amaaaaazing! Can I just ask are you putting the jars in oven at 170degrees for 30mins or turn oven off when it gets to temperature and have the jars in there as it cools?
I need to go buy strawberries and jars now!!
Hi Tino!
Just keep it at 170, without turning off the oven. In my opinion, this is the best, safest method for sterilizing the jars. I hope you have a chance to try the Jam! 🙂
This looks amazing! I need to make this for my family soon!
I want to eat this for breakfast all summer long. Pinned!
Oh my goooosh this looks good! And I know for a fact it tastes good, too 😉 Love that we’re on the same wavelength. Now if only my photos were as pretty as YOURS!!! lesson please 🙂
Both the jam and the juice look so bright and colourful. Is the 170 Centigrade or Fahrenheit?
HI! 🙂
It’s in Fahrenheit. I should probably start writing that out, ha? 😀
Yes! Where has summer gone??? High school definitely dragged on forever but what about winter? It felt like an eternity.
I could eat a jar of this jam with a spoon for sure. And it would be pretty healthy, right? BTW I love the way you sterilize the jars.