This post may contain affiliate links. Please read our disclosure policy.

These Pizza Balls are the perfect quick and easy appetizer. Rounds of soft, buttery, ready-to-bake biscuit dough are wrapped around a filling of tomatoes, mozzarella, and fresh basil and baked to ooey-gooey, golden-brown.

I feel like pizza is the ultimate party food. I mean, who doesn’t love a good old-fashioned slice of cheesy pizza? It’s hard to miss.
These pizza balls pack everything you love about it into the perfect two-bite appetizer. I took super convenient, ready-to-bake rounds of biscuit dough and wrapped it around a classic caprese pizza-esque filling of mozzarella, tomato, and basil. Then I popped ’em in the oven and baked them until the cheese got melty and the dough turned a perfect flaky golden brown. The resulting pizza balls (or bombs) are sure to charm the taste buds of anyone who tries them.
Why You’ll Love This Recipe
- Comfort food to the max. With a warm, gooey center and a fluffy, flavorful dough wrapped around it, these pizza bombs are total comfort food. They’ll remind you of your favorite simple (yet perfect-in-every-way) caprese pizza.
- Customizable. It’s super easy to adapt this recipe to your taste preferences. Use a different cheese, add some protein, or totally switch up the flavor profile. Check out the section below titled “Variation Ideas” for inspiration.
- Easy as [pizza] pie. The use of ready-to-bake store-bought biscuit dough is a lifesaver here. All you have to do is stuff the ingredients for your filling inside, close the dough around them, brush an egg wash over the pizza bombs, and bake them. Boom! Cheesy pizza bites in less than 30 minutes.
Are Pizza Balls and Pizza Bombs the Same Thing?
Yep! The terms “pizza bomb” and “pizza ball” both refer to a bite-sized app made up of some sort of pizza-esque dough wrapped around a pizza-inspired filling, usually mozzarella, tomato (or tomato sauce), and another topping or two you might find on a pizza. The filled dough balls (or bombs) are baked until the cheese on the inside is nice and melted, and the dough is golden brown.

Ingredient Notes
Here’s what you’ll need to make these cheesy pizza bombs. Be sure to scroll to the recipe card below for exact measurements.
- Ready-To-Bake Buttermilk Biscuits – You could make your own biscuit dough or pizza dough and use that instead, but the read-to-bake stuff is just SO much more convenient.
- Shredded mozzarella cheese – If you want to incorporate a little shredded parmesan or another cheese of your choosing here, you can.
- Roma tomatoes – Grape tomatoes would also work.
- Fresh basil – You could use dry basil, but fresh basil will give you a more vibrant flavor.
- Salt and fresh ground pepper
- Egg yolk – You’ll whisk the egg yolk with some water to create an egg wash. You could skip this step, but the egg wash gives the pizza bombs a little shine and helps them turn a more satisfying shade of golden brown.
- Water

Tips for the Best Pizza Balls
Before diving headfirst into the recipe, have a look at these simple tips and tricks. They’ll help set you up for success.
- Don’t over-stuff. Overstuffing the pizza bites can cause them to burst open as they bake. So make sure you can easily close the dough around your filling.
- Keep the air out. When wrapping the dough around the filling, try to squeeze any air out of the center before pinching the dough to seal it. This will help prevent the pizza bombs from bursting open as they bake.
- Bake close together. Arrange the pizza balls on the baking tray so that they are touching each other. This will help prevent them from spreading as they bake. Instead, they will rise nice and tall and the dough will get super fluffy.
- Make ahead magic. Instead of baking right away, arrange the pizza balls on a baking sheet, cover, and refrigerate for up to 24 hours. Otherwise, pop the baking sheet in the freezer for a couple of hours. Once the pizza bombs are firm, transfer them to a freezer bag and freeze for up to 3 months. When you are ready to enjoy, bake just as you normally would. Tack on extra 5 minutes or so if baking from frozen.
Variation Ideas
This pizza balls recipe is super easy to adjust to fit your personal preferences. Here are just a few variations that I have enjoyed experimenting with.
- Add some protein. Try adding a slice or two of pepperoni, salami, or prosciutto to your pizza bomb filling. Shredded chicken would work, too! Just remember not to over-stuff the biscuit dough.
- Cheese experimentation. Mozzarella is a classic choice, but feel free to branch out by mixing it with some shredded parmesan or pecorino. Goat cheese would be fun, too!
- Broccoli cheddar. Sometimes, I will take this recipe in a less pizza-y direction by stuffing the biscuit dough with cheddar cheese, roasted broccoli, and crumbled bacon (optional) instead of the classic caprese filling.
- Hawaiian style. If you like pineapple on pizza, try stuffing your biscuit dough with mozzarella, pineapple pieces, and some diced ham.

How to Store & Reheat Extras
- Refrigerator. Once the pizza balls have cooled to room temperature, seal them in an airtight container. They will keep in the fridge for up to 4 days.
- Freezer. Allow your cheesy appetizer bites to cool completely before arranging them on a baking sheet and popping them in the freezer for a couple of hours. Once the pizza bombs are firm, transfer them to a large Ziplock bag and store them in the freezer for up to 3 months.
- To reheat. Arrange the leftover pizza bombs in a single layer on a baking sheet lined with parchment paper. Bake at 350°F until heated through (~10-15 minutes if refrigerated and ~15-20 minutes if frozen).

More Pizza Recipes
- Easy Grilled Pizza Recipe
- Keto Pizza
- Pizza Sandwiches
- Breakfast Pizza
- Deep Dish Pizza
- Goat Cheese Pizza
Pin this now to find it later
Pin It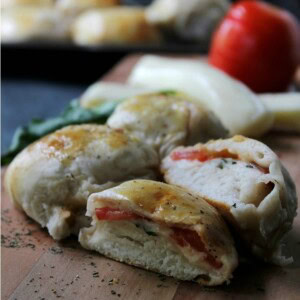
Caprese Cheese Bombs
Ingredients
- 1 tube, (10-count) Ready-To-Bake Buttermilk Biscuits
- 1/2 cup shredded mozzarella cheese
- 1 to 2 small roma tomatoes, , sliced into thin rounds (you might not use all slices)
- 1/4 cup sliced fresh basil
- salt and fresh ground pepper, , to taste
- 1 egg yolk
- 1 tablespoon water
- sprinkle of kosher salt and fresh ground pepper
Instructions
- Preheat oven to 400.
- Line baking sheet with foil and lightly grease with cooking spray; set aside.
- Flatten each biscuit-dough with the palm of your hand to about a 4-inch diameter.
- Evenly divide shredded mozzarella and add in the center of each dough-disc.
- Top with tomato slice (only 1 to 2 slices will fit), and sliced basil.
- Season with salt and pepper.
- Wrap each dough-disc closed, shaping it into a ball.
- Transfer to prepared baking sheet, seam side down, and arrange the rolls so that they are touching each other.
- In a small bowl whisk together egg yolk and water.
- Brush each roll with egg wash.
- Sprinkle a bit of kosher salt and pepper on top of each roll.
- Bake for 12 to 14 minutes, or until tops are golden brown.
- Remove from oven.
- Serve immediately.
Nutrition
Nutritional info is an estimate and provided as courtesy. Values may vary according to the ingredients and tools used. Please use your preferred nutritional calculator for more detailed info.


Im new but so glad i found you just the type of food and recipes ive been looking for cant wait to try them all thanks
I just made these for a cozy fall picnic and they were a huge hit! They were really easy and fun to make. Everyone loved them, and they were perfect for a picnic as they are utensil free!
Hi Katie!
That is great!! So happy to know that you all enjoyed them! Thank you!!
love this! what a great way to switch up pizza night
This is brilliant on the go quick and delicious looking buns. 🙂
This is the best idea! I totally see this lasting all week long for lunches.
Loved how you turned your ingredients on hand into this delightful pizza roll. 🙂 I love ready to use biscuit dough! I have some in my fridge right now. 🙂
Caprese anything is a good thing! Great idea to make this salad combo in a roll, Kate!
Definitely a successful Chopped moment!
Hi there, this looks amazing!!
What would you suggest to use if you don’t have access to ready-to-bake biscuits? We don’t have those where I live (South Africa)
Hi Nikki!! How about refrigerated dough? If you want to still keep it simple, go with that idea, if not, do you have a bread rolls recipe that you like to use? If not, I will send you a link.
I could try refrigerated dough… but even that is tough to get around here. I’m always searching for a tried and tested bread roll recipe! I would love it if you could link me to one/send me one.
thanks so much!
Love this blog
Oh goodness. I think I just found tonight’s dinner!