Easy Homemade Cannolis
Updated May 21, 2025
This post may contain affiliate links. Please read our disclosure policy.

These homemade cannolis are the perfect Italian sweet treat. The shell is delicate, crunchy, and buttery, and the filling is creamy and decadent, but they’re lighter than the cannolis that you’ll find at a bakery.

5 Star Review
“This was a huge hit at my house!! I will definitely make it again!” – Sandra
Cannolis are a pretty perfect dessert that have everything I want in a sweet dish. They’ve got a crunchy shell filled with rich, creamy ricotta. They’re decadent, crispy, sweet, smooth, juuust a little bitter, and yes, there’s chocolate, too. What’s not to love? Grab a shot of espresso or an iced Americano and pretend you’re living your best life on a balcony in Sicily, preferably in stretchy pants.
Why Make Cannolis From Scratch?
- Easy, yet impressive! When you buy cannolis at a bakery, they seem fancy and luxurious, but they’re actually quite easy to make! You can simply make perfect cannolis at home in under half an hour.
- Lighter. Not only do they taste every bit as good as the ones you’d get at the local bakery, but they’re a lot better for you, too. Does this mean you can have more than one? I’ll let you make the call on that front. But, the next time you have a sweet tooth, try this cannoli recipe. I know you’ll love it just as much as we do.

Ingredients For This Easy Homemade Cannolis Recipe
Here’s everything you need to make this Italian dessert. Scroll to the recipe card at the bottom of the page to see the exact amounts for each of the ingredients.
For the Shells:
- Egg Whites – Helps bind the shell batter and gives them a light, crisp texture when baked.
- Sugar – Sweetens the shells just enough to balance the creamy filling.
- Canola Oil – Adds moisture to the batter. You can sub with vegetable oil if needed.
- Unsalted Butter – Melted butter adds richness and flavor to the shells.
- Pure Vanilla Extract – A splash of pure vanilla extract brings out the sweetness and adds flavor.
- All-Purpose Flour – The base of the shell batter. Stick to all-purpose for best results.
For the Filling:
- Heavy Whipping Cream – Whipped to stiff peaks for a light, fluffy texture in the filling.
- Ricotta Cheese – Full-fat ricotta works best here.
- Cream Cheese – Helps stabilize the filling, making it smooth and creamy.
- Powdered Sugar – Sweetens the cannoli filling without making it grainy. Don’t substitute with granulated sugar here.
- Pure Vanilla Extract – Adds warmth and sweetness.
- Orange Zest – Just a hint of citrus gives the filling a classic cannoli flavor.
- Mini Chocolate Chips – Folded into the filling for that iconic little crunch of chocolate in every bite.
Recipe Tips
- Use room temperature ingredients. I recommend using room-temperature egg whites and cream cheese for this dessert recipe. Eggs and cream cheese mix together with the other ingredients so much better when they’re at room temperature, and that makes the cannolis much smoother.
- Space the cookies apart. When you put the cookies on the baking sheet, make sure you leave a few inches between each cookie. That way the cookies have space to expand in the oven without running into each other.
- Use a makeshift mold. Cannolis are traditionally shaped with a specific mold. If you don’t have a cannoli shell mold, the handle of a kitchen tool, such as a whisk, works great!
- Fold carefully. It’s very important to fold the whipped cream into the filling, instead of whisking or beating. This keeps the whipped cream from deflating, which keeps the filling from becoming dense. Very carefully fold the whipped cream into the rest of the cannoli filling, and stop as soon as the ingredients are mixed together.

FAQs
Here are some commonly asked questions about homemade cannolis.
Cannolis don’t last for long in the fridge, because the shell will get soggy quickly. It’s best to eat them within a few hours of making them.
The shells of cannolis are traditionally deep-fried. In this recipe, the shells are baked in the oven. They’re just as delicious as deep-fried shells, but easier to make.
Cannoli filling is traditionally made out of ricotta, and sometimes mascarpone. This recipe uses some ricotta but also includes cream cheese and whipped cream.

How to Serve Cannoli
My absolute favorite way to eat cannolis is with a shot of espresso or another coffee drink. Here are a few of my favorites.
How to Store Leftovers
- Leftover cannolis don’t store very well because the shells get soggy. You can store them in an airtight container in the fridge for 2-3 days, but the texture will deteriorate quickly. Instead, it’s best to store the shells and filling separately and assemble the cannolis right before serving them.
- You can store the filling in an airtight container in the fridge for up to 5 days, and the shells in an airtight bag at room temperature for 1 week. I do not recommend freezing cannolis.

More Easy Desserts to Make
If you enjoyed making a fancy and delicious dessert in less than half an hour, then you’ve got to try some of my other favorite easy desserts.
- Easy Tiramisu
- Apple Cobbler
- No Bake Mini Cheesecake Bites
- Two-Ingredient Homemade Ice Cream
- Frozen Yogurt Bark with Berries
Pin this now to find it later
Pin It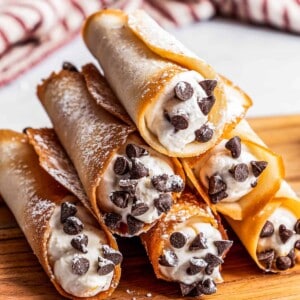
Homemade Cannolis
Ingredients
For the Cannoli Shells:
- 2 large egg whites, room temperature
- ⅓ cup sugar
- 1 tablespoon canola oil
- 1 tablespoon butter, melted
- 1 teaspoon pure vanilla extract
- ⅓ cup all-purpose flour
For the Creamy Ricotta Filling:
- ½ cup heavy whipping cream
- ½ cup ricotta cheese
- 3 tablespoons cream cheese, room temperature
- ½ cup powdered sugar
- 1 teaspoon pure vanilla extract
- 1 teaspoon grated orange zest
- 3 tablespoons semisweet mini chocolate chips
Instructions
Make the Shells:
- Prep. Preheat the oven to 375°F. Lightly grease two baking sheets with baking spray, then set aside.
- Make the cannoli batter. In a medium-size bowl, whisk together the egg whites, sugar, canola oil, melted butter, and vanilla. Whisk until thoroughly combined. Add in the flour and continue to whisk until smooth, and no lumps appear.
- Bake. Spoon 4 to 5 mounds of batter onto each baking sheet, using 3 teaspoons of batter for each. With the back of the spoon, spread each cookie to about 4-inch diameter. Space the cookies at least 2 inches apart. Bake for 7 to 8 minutes, or until edges begin to brown.
- Shape the cannolis. Remove the cookies from the oven and, using an offset spatula, immediately loosen the cookies from the baking sheet and shape them into a tube form. You can use a round metal utensil and wrap the cookies around that. Set cookies seam-side down and let them cool.
Prepare The Ricotta Filling:
- Meanwhile, make the whipped cream. Place the heavy whipping cream in your mixer's bowl and beat on high until stiff peaks form, about 4 minutes. Refrigerate if not using right away.
- Make the ricotta mixture. In a large mixing bowl, beat together the ricotta cheese, cream cheese, powdered sugar, vanilla, and orange zest until smooth and creamy.
- Combine. Fold in the previously prepared whipped cream and fold in the chocolate chips. Do not mix or stir – fold it.
- Fill the cannoli and serve. Spoon the filling into a pastry bag fitted with a wide round tip and pipe the filling into the cannoli shells. Garnish with mini chocolate chips and an optional chocolate drizzle, and serve.
Notes
- Use room temperature ingredients. Eggs and cream cheese mix with the other ingredients so much better when they’re at room temperature, making the cannolis much smoother.
- Space the cookies apart. When you put the cookies on the baking sheet, leave a few inches between each cookie. That way, the cookies have space to expand in the oven.
- Use a makeshift mold. Cannolis are traditionally shaped with a specific mold. If you don’t have a cannoli shell mold, use a kitchen tool’s handle, such as a wooden spoon or a whisk.
- It’s important to fold the whipped cream into the filling instead of whisking or beating. This keeps the whipped cream from deflating, preventing the filling from becoming dense. Very carefully fold the whipped cream into the remaining cannoli filling, stopping as soon as the ingredients are well combined.
- Do not store assembled pastries. Store the empty shells at room temperature in an airtight container for up to 1 week. Store the filling in a tightly sealed container in the fridge for up to 5 days. Do not freeze.
- Recipe was adapted from “Sweetie Pie: The Richard Simmons Private Collection of Dazzling Desserts.”
Nutrition
Nutritional info is an estimate and provided as courtesy. Values may vary according to the ingredients and tools used. Please use your preferred nutritional calculator for more detailed info.
How to Make Cannolis
Here’s how to make this mouth-watering dessert in less than 30 minutes.
- Prep. Preheat your oven to 375˚F, and grease 2 baking sheets with cooking spray.
- Mix the wet ingredients. Add the egg whites, oil, melted butter, vanilla, and sugar to a bowl. Whisk until well combined.
- Add the flour. Add the flour to the bowl, and mix until there are no lumps.


- Shape the dough. Spoon the batter onto the prepared baking sheets in 3 teaspoon portions. Use the back of a spoon to spread each cookie to a 4-inch circle.


- Bake. Put the cookies in the oven until they begin to turn brown. This should take 7-8 minutes.
- Shape the cookies. Use an offset spatula to shape the cookies into a tube shape.
- Cool. Let the cookies cool seam-side down.


- Whip the cream. Add the whipping cream to a bowl, and beat until it forms stiff peaks. This should take about 4 minutes. Then put the whipped cream in the fridge.
- Make the filling. Add the cream cheese, ricotta, vanilla, orange zest, and powdered sugar to a bowl, and mix until well combined.


- Fold in the cream. Add the whipped cream and chocolate chips and fold them in.
- Assemble. Place the filling in a piping bag, and pipe it into the cannoli shells. Garnish with additional chocolate chips at the tips, and optionally drizzle melted chocolate over the top. Serve immediately.


How many standard size cannolli will this make?
Hi!
This recipe usually makes about 8 to 10 standard-size cannoli, depending on how big you shape the shells. You’ll find all those details, including measurements and instructions, in the recipe card at the bottom of the post! 😊
Ok I baked around 100 cannoli shells 2 days before the event and piped them the night of our Italian themed dinner. EVERYONE LOVED THEM!!! Those who have had cannoli before said they were the best they have ever had!! Those who had not had one before may be disappointed when they have an authentic one. LoL!! Thank you for this wonderful recipe!!
That’s amazing to hear! So glad everyone loved them — sounds like you nailed it! 😊 Thank YOU! 🙂
This was a huge hit at my house!! I will definitely make it again!
I am very happy you and your family enjoyed this recipe! Thank YOU! 🙂
Wow, I never realized how easy these were to make! Thank you for the recipe
I hope you love it! Thank YOU! 🙂
Looks amazingly delicious! I would love to try this!
Thank you so much! I hope you enjoy it! 🙂
I am mouthwatering over these cannolis. I’ve never made them at home!
I hope you love them! Thank YOU! 🙂