This post may contain affiliate links. Please read our disclosure policy.
This cherry cheesecake recipe is a super creamy classic cheesecake topped with juicy cherries in a golden, baked Graham cracker crust. I’ll show you how to bake the perfect cheesecake that’s crack-free! And you can make the cherry topping from scratch or save time with a can of cherry pie filling!

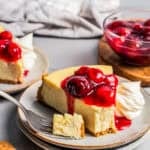
A cherry cheesecake was the perfect way to use up leftover filling when I made too much for my homemade cherry pie. I baked a classic cheesecake and topped it with a layer of juicy cherries. It was so good! The contrast of rich and creamy vanilla cheesecake with the sweet, tart, tangy cooked cherries is be.yond. It’s perfect.
Reasons You’ll Love This Cherry Cheesecake Recipe
- Rich, creamy cheesecake. The base is a dense and creamy New York-style cheesecake, made from scratch.
- Step-by-step. I include all of my best tips and simple steps for a perfect, crack-free cheesecake.
- Festive for the holidays. The juicy red cherries and snowy white cheesecake make this a perfect Christmas dessert. I use frozen cherries, so it’s really a year-round recipe. Canned cherry pie filling will also work!


What You’ll Need
You’ll need the following ingredients to make a classic cheesecake, along with the rich homemade cherry pie filling for the topping. Scroll to the printable recipe card for the full recipe amounts.
- Graham Crackers – To blend and combine with melted butter and brown sugar to make an easy homemade graham cracker crust. I use about 14-15 full sheets of crackers to make enough crust for a 9” pan.
- Cream Cheese – Full-fat cream cheese will give the cheesecake an extra-rich, creamy texture.
- Greek Yogurt – Sour cream is a good substitute if you need one.
- Sugar and Eggs – Our baking basics, to give the cheesecake structure.
- Lemon Juice – Freshly squeezed is best.
- Vanilla Extract – Or an equal amount of vanilla paste.
- Flour – All-purpose flour, measured using a kitchen scale or the spoon and level method. Spoon the flour into the measuring cup. Don’t scoop! Afterward, level off the cup with the back of a knife to avoid packing in too much flour.
Cherry Topping
- Cherries – I use frozen cherries and thaw them first. You can also make the topping with fresh cherries if they’re in season. You may need to simmer the cherry filling for slightly longer, in this case.
- Sugar – Granulated sugar or light brown sugar, to sweeten and caramelize the topping. I also add a little salt for balance.
- Cornstarch – To combine with water and lemon juice to make a slurry. This helps thicken the filling.

Cheesecake Tip: Use Room Temperature Ingredients
Before you begin, bring fridge-cold ingredients like cream cheese, yogurt, and eggs, to room temperature. Doing so avoids lumps in the cheesecake and uneven baking. If you need to do this in a hurry, these are some quick tricks:
- Soften cream cheese quickly. Pour boiling water into a heat-proof glass or ceramic bowl. Leave it to warm up for 5 minutes. Then, dump out the water and place the bowl over the cream cheese. Wait another 10-15 minutes, and the heat from the bowl should soften the cream cheese right up!
- Bring eggs to room temperature. Place the cold eggs in a bowl of warm (not hot) water and let them sit for 10 minutes.
- Bring the sour cream to room temperature quickly. Ideally, the sour cream should come to room temperature gradually. However, if you need it warmed in a hurry, you can use the microwave. Heat in 5-10 second increments and stir in between until it’s no longer cold. Don’t overheat the sour cream; otherwise, it changes the texture.

More Tips and Variations
- Bake in a water bath. Wrapping the pan and baking the cheesecake in a water bath is the best way to ensure a cheesecake without cracks. Don’t skip this step! I go into this in detail in the recipe steps.
- Gradual cooling is key. Sudden temperature changes can cause the cheesecake to crack or sink. Cool the cheesecake inside the oven with the door ajar, then at room temperature, and finally in the fridge overnight.
- Change up the fruit in the topping. Just about any fruit or pie filling will work in place of cherries on top of this cheesecake! Swap cherries for fresh or frozen strawberries, raspberries, blueberries, blackberries, or berry pie filling. You can also make a fall version topped with apple pie filling.
Pin this now to find it later
Pin It
Cherry Cheesecake Recipe
Ingredients
For the crust:
- 6 tablespoons unsalted butter, melted
- 1 tablespoon brown sugar, packed
- 1¾ cups ground Graham crackers, packed, about 14-15 full sheets of crackers
For the cheesecake layer:
- 32 ounces cream cheese, room temperature
- 4 ounces Greek yogurt, room temperature
- 1½ cups granulated sugar
- 4 large eggs, room temperature
- 1 tablespoon fresh lemon juice
- 1 tablespoon pure vanilla extract
- 3 tablespoons all purpose flour
For the cherry topping:
- 3 cups frozen cherries, thawed
- ⅓ cup water
- ⅓ cup granulated sugar
- 1½ tablespoons cornstarch, + 2 tablespoons water
- 1 tablespoon fresh lemon juice
- 1 good pinch of salt
Instructions
Make the crust:
- Prep your tools. Preheat the oven to 350ºF. Use a piece of butter to grease a 9-inch springform baking pan. As an extra step, you can also line the bottom and sides of the cake pan with parchment paper.
- Combine the butter and sugar. Combine the melted butter and sugar in a medium bowl. Stir until the sugar dissolves.
- Add the crackers. Pulse the crackers in a food processor until you have crumbs. Measure to make sure you have the right amount, then add the crumbs to the butter mixture and stir until well combined.
- Shape the crust. Add the crumb mixture to your pan, spreading it across the bottom. Using a cup or tall glass, push the crust base toward the edges and a little up the sides. Press down firmly to compress the crust into the bottom and edges.
- Bake the crust. Bake your crust in the heated oven for 8-10 minutes. Remove the crust and set aside. Then, reduce the oven temperature to 320ºF.
Prepare the filling:
- Start making your base. Combine the cream cheese, yogurt, and sugar in a large stand mixer bowl. Using the paddle attachment (or a hand-held mixer), beat the ingredients until smooth and well combined.
- Add the eggs. Gradually add the eggs, one at a time, beating well after each addition.
- Finish the filling. Add lemon juice, vanilla extract, and flour. Beat briefly until combined.
- Add to your crust. Pour the filling into the crust. Gently smooth the surface with the back of a spoon or a spatula.
- Prepare the water bath. Wrap your pan with several layers of heavy-duty, wide aluminum foil, covering the bottom and sides. Use a crisscross pattern. Place the wrapped pan into a larger roasting pan and fill the roasting pan with 1-inch hot water. (see my notes below for more information)
- Bake. Carefully move the cheesecake to the oven and bake the cake for 1 hour and 30 minutes at 320ºF.
- Cool. Turn off the oven and crack the door open a few inches. You can prop it open with a wooden spoon or a folded kitchen towel to let the cheesecake cool slowly and prevent cracking. Cool the cheesecake for about 1 hour while in the oven. Then remove it from the oven and allow it to cool on the counter to room temperature.
Prepare the cherry topping:
- Cook the cherries. Meanwhile, add the cherries, water, and sugar to a medium sauce pot and bring to a simmer.
- Make the slurry. In a small bowl, whisk the cornstarch with the 2 tablespoons of water and the lemon juice until completely smooth.
- Finish the topping. Add the cornstarch slurry to the cherries and cook at a simmer for 3-4 minutes or until thickened. Set aside to cool.
Finish the cheesecake:
- Add the topping. Spoon the cherry filling over the top of the cool cheesecake.
- Chill. Place the cheesecake in the fridge for 8 hours or overnight.
- Dig in! Slice and serve.
Equipment
Notes
- Water bath: When baking a cheesecake in a water bath, make sure to seal the bottom of the springform pan really well so nothing leaks in. I use wide, heavy-duty foil and wrap it in a few layers, crisscrossed over the bottom and up the sides. It’s not fancy, but it keeps everything nice and dry.
- Cooling the cheesecake in the oven: Cracking the oven door after baking helps the cheesecake cool gradually, which prevents cracks on top. A wooden spoon or a folded kitchen towel works great to keep it propped just enough without letting too much heat escape all at once.
Nutrition
Nutritional info is an estimate and provided as courtesy. Values may vary according to the ingredients and tools used. Please use your preferred nutritional calculator for more detailed info.
How to Make Cherry Cheesecake From Scratch
First things first, follow these steps to prepare a classic New York-style cheesecake, which is the base for this homemade cherry cheesecake recipe.


- Mix the crust. While the oven preheats to 350ºF, grease a 9-inch springform pan. Meanwhile, dissolve the sugar with melted butter, and stir in the Graham cracker crumbs.
- Shape the crust. Press the crust firmly into the bottom and up the sides of the prepared pan.
- Bake the crust. Next, parbake the Graham cracker crust at 350ºF for 8-10 minutes, then set it aside to cool. Lower the oven temperature to 320ºF while you prepare the cheesecake batter.
- Make the cheesecake filling. Beat cream cheese with the yogurt and sugar. Then, mix in the eggs, one at a time, followed by the lemon juice and vanilla. Lastly, add the flour and mix until smooth.
- Fill the crust. Pour the filling into your baked and cooled cheesecake crust. Spread it with a spatula so the top is smooth and even.
Bake the Cheesecake in a Water Bath
To bake your cheesecake in a water bath, you’ll need to seal the bottom of the pan to prevent water from seeping in.
When wrapping the springform pan in this recipe, I use heavy-duty, wide aluminum foil. My trick is to use multiple layers of foil to wrap the pan in a criss-cross pattern.


- Prepare a water bath. Wrap the pan with heavy-duty aluminum foil so it’s watertight. Place the wrapped cheesecake inside a larger roasting pan. Fill the pan with about 1 inch of hot water (you can do this before or after placing the pan in the oven).
- Bake. Bake the cheesecake at 320ºF for 1 ½ hours. This lower temperature, combined with a longer cooking time, allows the cheesecake to bake slowly and evenly.
- Cool the cheesecake gradually. Afterward, switch off the oven and crack the door. Leave the cheesecake to cool inside the still-warm oven for 1 hour. Then, move the cheesecake to the counter to cool completely.
Why a Water Bath?
The reasons for baking a cheesecake in a water bath (bain-marie) are pretty simple. The water bath uses indirect heat, so the cheesecake bakes evenly. Combined with the steam as the water evaporated, this helps prevent cracks. The result is a super-smooth, creamy baked cheesecake!
Add the Cherry Topping
While the cheesecake cools, gather your cherry topping ingredients. You can also prepare this cherry filling up to 2 days in advance and keep it refrigerated until you’re ready to top the cheesecake.


- Cook the cherries. In a saucepan, bring fresh or frozen cherries to a simmer with sugar and water. Separately, whisk cornstarch with water and lemon juice to make a slurry. Stir the slurry into the cherries and cook for 3-4 minutes. Set the cherry topping aside to cool.
- Finish the cheesecake. Once cooled, spoon the cherries on top of the cheesecake. Afterward, cover the cherry cheesecake and refrigerate it overnight.

How to Store
- Refrigerate. Keep the cherry cheesecake covered in the fridge for up to 4 days. You can store it with or without the cherry topping.
- Freeze. I recommend freezing the cheesecake before adding the topping. Make sure to chill the cheesecake completely in the fridge, and then double-wrap the pan with plastic wrap. Freeze for up to 2 months. Thaw the cheesecake in the fridge before serving with the cherries on top!